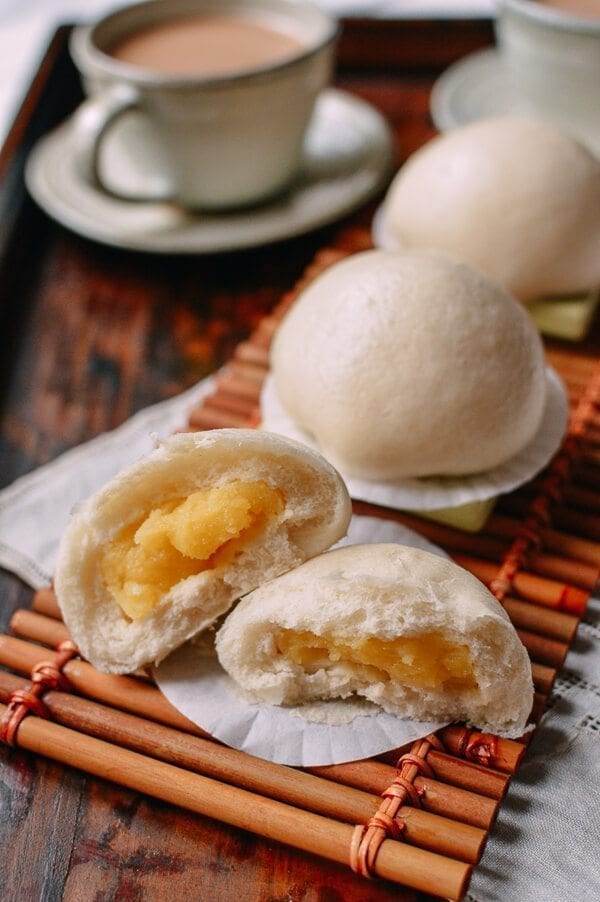
Chinese Steamed Custard Buns (nai wong bao, 奶黄包)
Printed from nanasfogon.com/recipe/steamed-custard-buns · Original: https://omnivorescookbook.com/steamed-custard-buns/
- Prep
- 60 min
- Cook
- 20 min
- Total
- 1 hr 20 min
Ingredients
Dairy-free version. Swapped:
whole milk → unsweetened oat milk; butter → dairy-free plant butter (pareve)
Good for vegan, lactose-free and kosher meat meals. Check labels: some plant butters and creamers aren't certified parve or contain nuts or coconut.
- 125 g (1/2 cup) water , warm
- 7 g (1 packet / 2 teaspoons) active dry yeast About yeast →
- 60 g (4 tablespoons) sugar
- 250 g (1 2/3 cup) cake flour (or low gluten flour) About cake flour →
- 7 g (2 teaspoons) baking powder About baking powder →
- 7 g (1 1/2 teaspoons) shortening
- 20 grams (3 tablespoons) cornstarch About cornstarch →
- 3 grams (1 teaspoon) all-purpose flour About all-purpose flour →
- 56 grams (1/4 cup) granulated sugar , seperated About granulated sugar →
- 3 large Pete and Gerry’s Organic Eggs egg yolks About eggs →
- 240 grams (1 cup) whole milk About whole milk →
- 15 grams (1 tablespoon) butter
- 1/4 teaspoon vanilla extract About vanilla extract →
Out of something?
- Active dry yeast
- for 1 packet (2 1/4 tsp), use 2 1/4 tsp instant yeast, mixed straight into the flour. Instant rises a little faster; start checking the first rise early. Skip the proofing step.
- Cake flour
- for 1 cup, use 1 cup all-purpose flour minus 2 tbsp, plus 2 tbsp cornstarch, sifted together twice. Close for most layer cakes. Not quite as fine or as white as bleached cake flour.
- Baking powder
- for 1 tsp, use 1/4 tsp baking soda + 1/2 tsp cream of tartar. This is single-acting: it starts working when it gets wet, so get the batter into the oven right away.
- Cornstarch
- for 1 tbsp, use 1 tbsp potato starch or arrowroot, or 2 tbsp all-purpose flour. Potato starch thickens at a lower temperature and turns stringy if boiled hard. Flour makes an opaque, less glossy sauce and needs a few minutes' simmer.
- Flour
- For thickening: for 1 tbsp, use 1/2 tbsp potato starch or cornstarch, mixed into cold liquid first. Clearer, glossier sauce. Add at the end and don't boil long: starches thin out if overcooked.
- For dredging: for 1 cup, use 1 cup potato starch, rice flour or matzo cake meal. Starch gives a thinner, crisper coating; matzo cake meal browns like flour. Rice is kitniyot for Ashkenazim.
- Milk
- for 1 cup, use 1/2 cup evaporated milk + 1/2 cup water, or 2/3 cup skim milk + 1/3 cup half-and-half. Evaporated milk tastes slightly cooked; fine in baking.
- Butter
- Melted, in cakes & muffins: for 1 cup, use 3/4 cup neutral oil. Moister, more tender, keeps longer; no buttery flavor. Not for recipes that cream butter and sugar.
- For sautéing: for 1 tbsp, use 1 tbsp olive oil or neutral oil, or schmaltz in meat dishes. Less browning flavor. Schmaltz gives savory depth to onions, potatoes and kasha.
- Vegan, for baking: for 1 cup, use 1 cup refined coconut oil: solid for creaming, melted where melted butter is called for. Refined has no coconut taste. Coconut oil is 100% fat, so cookies spread more and pastry is crumblier; chill doughs well.
- Vanilla extract
- for 1 tsp, use 1 tsp vanilla paste, 1/2 vanilla bean (seeds scraped), or 1/2 tsp vanilla powder; alcohol-free: maple syrup. Bean and paste give flecks and more aroma. Maple adds a different warmth; it's not vanilla.
Steps
-
1
Prepare the dough
-
2
Add the water into a small bowl and warm to approximately 100-110°F (38°C), about 30 seconds in the microwave. The water should be warm, just a bit above body temperature. Add the sugar and active dry yeast. Let sit for 5 minutes so the yeast will activate.
-
3
While the yeast activates, add the cake flour and baking powder into your mixer bowl.
-
4
Once the yeast is activated, you should see bubbles on the surface of the mixture. Pour it into the mixer bowl. Mix with a spatula a few times, until the liquid is just absorbed by the dry ingredients.
-
5
Install the dough hook on your mixer. Start at low speed, then gradually increase to speed setting to 6 out of 10. Knead for 10 minutes, until the dough is very smooth. Stop the mixer in the middle and scrape the dough from the sides of the bowl.
-
6
Add the shortening. Knead on level 6 for another 5 minutes. The dough should be soft, smooth, and easily lift from the bowl without sticking to your hands.
-
7
Lightly grease a large bowl with butter or oil spray. Transfer the dough into the bowl. Cover the bowl with plastic wrap and let it rest in a warm part of your room, until the size triples, about 2 hours.
-
8
Prepare the custard
-
9
Prepare the custard while the dough is resting. Mix the cornstarch, all-purpose flour, and half of the sugar together in a small bowl.
-
10
Place the egg yolks in a large bowl. Stir a few times to mix the yolks.
-
11
Add the milk and the remaining half of the sugar into a small saucepan. Heat over medium heat. Stir occasionally to dissolve the sugar completely. Cook until it reaches about 120 °F/ 49 °C (no more than 150 °F / 65 °C). You might see a few bubbles here and there. If the milk starts foaming, it’s too hot.
-
12
While the milk starts to get warm, add the dry ingredients (from step 1 of the custard) into the bowl with the egg yolks. Whisk until it forms an even paste. Do not add the dry ingredients too early, because the sugar will change the texture of the eggs.
-
13
Add the warm milk into the egg yolk mixture, about 1/4 cup at a time. Whisk constantly until the milk is fully incorporated into the paste. Continue to add more milk, a 1/4 cup at a time and continuously stirring, until it forms a thin, smooth mixture and all the milk is added.
-
14
Return the mixture back to the pot (the one you used to heat the milk). Heat over medium low heat and stir constantly, until the mixture thickens, 5 minutes or so. Keep cooking and stirring, until you can draw a line on the bottom of the pot using a spatula. (Note, the custard will start to thicken suddenly, like a switch was flipped. So you should keep a close eye on it.)
-
15
Remove the pot from the stove immediately. Add the butter and vanilla extract. Stir to mix well.
-
16
Line a large, deep plate with plastic wrap. Place a large mesh strainer on top.
-
17
Pour the custard into the lined plate through the strainer to smooth out the texture. Use a spatula to press the custard through the strainer if any lumps remain.
-
18
Cover the custard with plastic wrap. Press the wrap against the custard, so it won’t form a skin once it’s chilled.
-
19
Chill the custard in the fridge until it’s cooled, 2 hours or so. Or in the freezer for 30 mins.
-
20
Assemble
-
21
Cut some parchment paper into 3” (7 cm) squares to hold the buns. You’ll need 16 squares.
-
22
Punch the air out of the dough. Transfer it onto a lightly oiled working surface. Knead a few times to make the dough into a round ball. Divide the dough into 16 even pieces by cutting it into 2 even strips, then further cutting each strip into 4 small pieces. Each piece of dough should weigh 27 grams. Use your hands to roll and shape the dough pieces into dough balls.
-
23
Wrap the buns one at a time.
-
24
Flatten the dough ball using your palm. Use a rolling pin to roll a dough ball into a round disc that is thick in the middle and thin on the edges, about 2.5 to 3” (6 to 7 cm) in diameter. Carefully remove it from the surface and place it onto your palm.
-
25
Place about a heaping tablespoon of custard onto the center of the wrapper. Press the custard into the dough to release any air bubbles within the custard. Use your other hand to gather the wrapper onto the top of the custard filling. The dough sheet will start to form pleats and retain its round shape.
-
26
Once done, place the custard bun onto one of the cut parchment squares, pleated-side-down, then place it on a plate. Loosely cover it with plastic wrap to prevent them from drying out. Repeat the process to wrap the rest of the buns.
-
27
Set a stopwatch (or timer) after wrapping the first bun, to keep track of the resting time. You need to rest the buns for 20 to 30 minutes before steaming.
-
28
Steaming
-
29
Depending on the size of your steamer, you might need to steam the buns in batches. What I usually do is prepare the steamer after wrapping half of the buns, so some of them are ready to be cooked as you work on the rest.
-
30
To prepare the steamer, add about 3” (7 cm) of water to the pot and heat over medium-high heat until the water starts to boil. Place the rested buns onto the steamer rack, leaving at least 2” (5 cm) in between, because the buns will expand a lot as they cook.
-
31
Cover and let steam for 10 minutes. Once done, remove the steamer rack and place it onto a trivet. Uncover the steamer rack carefully. Let the steam out and then transfer the buns onto a serving plate. Let the buns cool for 5 minutes before eating.
-
32
Cook the rest of the buns using the same method.
-
33
Serve and store
-
34
The custard buns taste best when they are still warm, but you can serve them at room temperature, as well.
-
35
Once the buns have cooled completely, place them in a sealed container at room temperature, if serving the same day.
-
36
You can store the buns for 2 to 3 days in the fridge. To serve, heat up the buns until warm using the microwave.
Flavor map
How Nana pairs flavors →This one is rich and sweet.
Goes well with
 Goes with
Angel Food Cake Strawberry Ice Cream Sandwiches
58% flavor match
Almond extract loves vanilla; they share vanilla.
 Goes with
Chocolate Crepes
57% flavor match
Both lean on vanilla and milk; cocoa loves vanilla.
 Goes with
Chicken Hotdog Bread
56% flavor match
Both are sweet; milk with vanilla is a natural match.
 Also on the table
Easy Chocolate Frosting
64% flavor match
Chocolate and vanilla are a classic pair; they share vanilla.
Log in to tell Nana which pairings are good. Your votes improve the map.
More about this recipe
Nutrition
1 of 16 servings · about 45 g Whole recipe · about 717 g · High confidence
| % DV* | ||
|---|---|---|
| Total Fat | 2.7 g | 3% |
| Saturated Fat | 1.2 g | 6% |
| Trans Fat | 0.031 g | |
| Cholesterol | 38 mg | 13% |
| Sodium | 61 mg | 3% |
| Total Carbohydrate | 21.9 g | 8% |
| Dietary Fiber | 0.4 g | 1% |
| Total Sugars | 8.1 g | |
| Protein | 2.5 g | 5% |
| Vitamin D | 0.37 mcg | 2% |
| Calcium | 49 mg | 4% |
| Iron | 1.3 mg | 7% |
| Potassium | 45 mg | 1% |
* % Daily Value is based on a 2,000-calorie diet.
- Carbs 72%
- Fat 20%
- Protein 8%
Vitamins & minerals
| Vitamin A | 25.5 mcg | 3% |
|---|---|---|
| Vitamin C | 0.001 mg | 0% |
| Vitamin D | 0.37 mcg | 2% |
| Vitamin E | 0.14 mg | 1% |
| Vitamin K | 0.37 mcg | 0% |
| Thiamin (B1) | 0.2 mg | 17% |
| Riboflavin (B2) | 0.13 mg | 10% |
| Niacin (B3) | 1.3 mg | 8% |
| Pantothenic acid (B5) | 0.28 mg | 6% |
| Vitamin B6 | 0.028 mg | 2% |
| Folate | 60.3 mcg DFE | 15% |
| Vitamin B12 | 0.13 mcg | 5% |
| Choline | 30 mg | 6% |
| Calcium | 49 mg | 4% |
| Iron | 1.3 mg | 7% |
| Potassium | 45 mg | 1% |
| Magnesium | 5 mg | 1% |
| Phosphorus | 51 mg | 4% |
| Zinc | 0.26 mg | 2% |
| Copper | 0.031 mg | 3% |
| Manganese | 0.11 mg | 5% |
| Selenium | 3.3 mcg | 6% |
Fats & carbs in detail
| Monounsaturated fat | 0.92 g | |
|---|---|---|
| Polyunsaturated fat | 0.37 g | |
| Omega-3 | 0.032 g | 2% |
| Omega-6 | 0.33 g | 2% |
| Starch | 0 g | |
| Net carbs | 21.5 g | |
| Omega-6 : Omega-3 ratio | 10.3 : 1 |
Amino acids (protein building blocks)
| Histidine | 0.058 g | |
|---|---|---|
| Isoleucine | 0.11 g | |
| Leucine | 0.19 g | |
| Lysine | 0.14 g | |
| Methionine | 0.049 g | |
| Cystine | 0.042 g | |
| Phenylalanine | 0.12 g | |
| Tyrosine | 0.088 g | |
| Threonine | 0.087 g | |
| Tryptophan | 0.033 g | |
| Valine | 0.13 g |
How we calculated this
| Ingredient | Counted as | g | kcal |
|---|---|---|---|
| 125 g (1/2 cup) water , warm | Water | 0 | |
| 7 g (1 packet / 2 teaspoons) active dry yeast | Leavening agents, yeast, baker's, active dry | 7 | 23 |
| 60 g (4 tablespoons) sugar | Sugars, granulated | 60 | 232 |
| 250 g (1 2/3 cup) cake flour (or low gluten flour) | Wheat flour, white, cake, enriched | 250 | 905 |
| 7 g (2 teaspoons) baking powder | Leavening agents, baking powder, double-acting, sodium aluminum sulfate | 7 | 4 |
| 7 g (1 1/2 teaspoons) shortening | Shortening, household, soybean (partially hydrogenated)-cottonseed (partially hydrogenated) | 7 | 62 |
| 20 grams (3 tablespoons) cornstarch | Cornstarch | 20 | 76 |
| 3 grams (1 teaspoon) all-purpose flour | Wheat flour, white, all-purpose, enriched, bleached | 3 | 11 |
| 56 grams (1/4 cup) granulated sugar , seperated | Sugars, granulated | 56 | 217 |
| 3 large Pete and Gerry’s Organic Eggs egg yolks | Egg, yolk, raw, fresh | 51 | 164 |
| 240 grams (1 cup) whole milk | Milk, whole, 3.25% milkfat, with added vitamin D | 240 | 146 |
| 15 grams (1 tablespoon) butter | Butter, salted | 15 | 108 |
| 1/4 teaspoon vanilla extract | Vanilla extract | 1 | 3 |
Matched to the USDA FoodData Central database (SR Legacy). Amounts are converted with USDA portion weights where they exist, otherwise typical sizes. Open in the analyzer to adjust a match →
Estimated from the ingredient list — brands, exact sizes and cooking losses vary. Not medical advice.
Allergens
-
Corn
In: 20 grams (3 tablespoons) cornstarch
Corn and corn products: cornstarch, corn syrup, cornmeal, polenta, masa, corn oil.
-
Egg
In: 3 large Pete and Gerry’s Organic Eggs egg yolks
Whole eggs, yolks, whites and egg-based sauces like mayonnaise, aioli and hollandaise.
-
Milk / dairy
In: 240 grams (1 cup) whole milk; 15 grams (1 tablespoon) butter
Cow's milk and anything made from it: butter, cream, cheese, yogurt, whey, casein, ghee.
-
Vanilla
In: 1/4 teaspoon vanilla extract
-
Gluten › Wheat
In: 250 g (1 2/3 cup) cake flour (or low gluten flour); 3 grams (1 teaspoon) all-purpose flour
Wheat, barley, rye and oats (oats are often cross-contaminated). Celiac disease and wheat allergy are different — pick just Wheat if only wheat is the problem.
-
Yeast
In: 7 g (1 packet / 2 teaspoons) active dry yeast
Found by reading the ingredient names. Brands and "may contain" warnings vary, so always check the label.
Questions about this recipe
- Can I make these ahead of time?
- Yes, you can prepare the custard filling and the dough in advance; just ensure the custard is fully chilled before assembling the buns.
- How should I store or freeze the buns?
- Store leftover buns in an airtight container in the fridge, or freeze them individually wrapped; reheat by steaming again to restore the soft texture.
- What can I use if I don't have cake flour?
- You can substitute cake flour with all-purpose flour, though the buns may be slightly less spongy and smooth.
- How do I tell when the buns are finished steaming?
- The buns should feel light and springy to the touch and have a consistent, smooth pale-yellow or white appearance.
- What is the best way to serve these?
- Serve them warm immediately after steaming to ensure the custard filling has a melt-in-your-mouth texture.
My notes
Log in to keep private notes on recipes.
Learn while you cook
Learn library →- Why It Works · 5 min read Gluten & Kneading Two wheat proteins plus water make gluten, a stretchy net that traps gas; kneading and time build it for chewy bread, w…
- Ingredient Deep-Dives · 7 min read Flour: Which Bag for Which Bake Protein decides everything. More protein means more gluten and chew (bread), less means tender (cake); all-purpose sits…
- Why It Works · 4 min read Baking Soda vs. Baking Powder Baking soda is a base that needs an acid in the recipe to work; baking powder is soda with its acid already mixed in — …
Words in this recipe
- Knead
- To work dough by pressing, folding and turning, developing gluten for structure and chew. Learn more
- Rest
- To let food sit after cooking (meat) or mixing (dough, batter) so juices redistribute or gluten relaxes. Learn more
Handy for this recipe Measurements & ConversionsSubstitution Finder